How I Measured Brushless Motor Thrust


Measuring Brushless Motor Thrust (1000KV, 9x4 Prop, 3S LiPo)
Introduction
When building and flying RC airplanes, one of the most important performance indicators is thrust—the amount of force the motor and propeller can generate to lift and propel the aircraft. Recently, I conducted a simple but insightful experiment to measure the thrust produced by a 1000KV brushless motor paired with a 9×4 propeller and a 3S LiPo battery.
This test demonstrates how everyday tools, like a kitchen scale, can be used to understand RC motor performance.
Why This Experiment Matters
Doing such measurements is not just about curiosity—it can prevent damage to your equipment.
In the past, I used an oversized propeller with a 2200KV motor without testing it first. The motor drew far more current than expected, and my ESC couldn’t handle the load—it ended up getting damaged.
By running a simple thrust test like the one described here, you can avoid this costly mistake. Measuring current draw vs. thrust helps you:
- Choose the right propeller for your motor.
- Prevent ESC and battery overload.
- Achieve a safer and more efficient setup.
Safety Warning
Keep your fingers, hands, and any loose items away from the propeller at all times.
Even small RC props can spin at thousands of RPM and cause serious injury.
When testing motors:
- Always secure the motor and mount before powering up.
- Stand to the side, never directly in front of the propeller.
- Use safety glasses if available.
- Increase throttle gradually to avoid sudden surges.
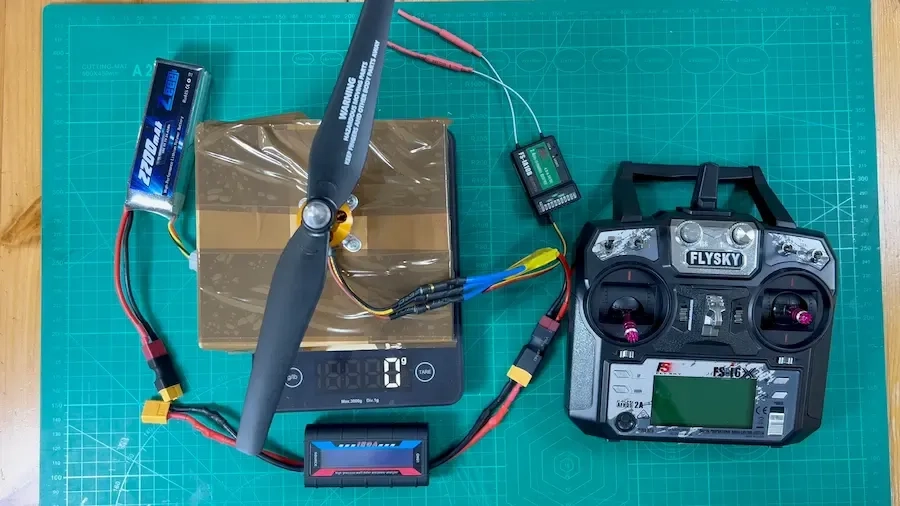
Materials Used
For this experiment, I used the following setup:
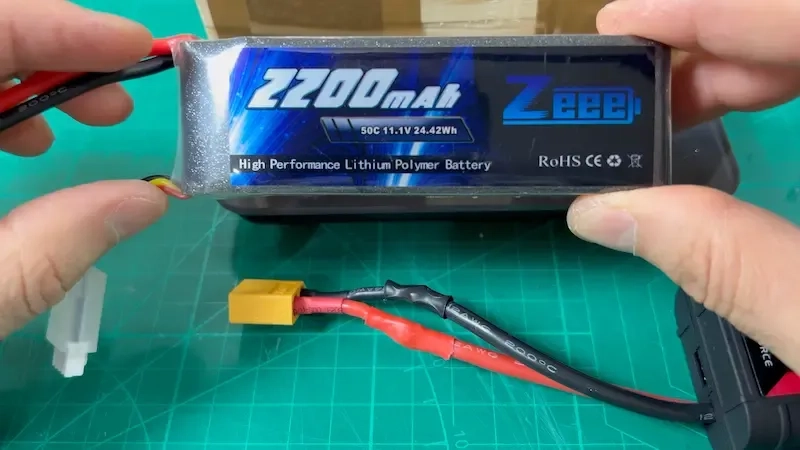
- Brushless motor: 1000KV
- Propeller: 9×4
- Battery: 3S LiPo
- ESC: 30A
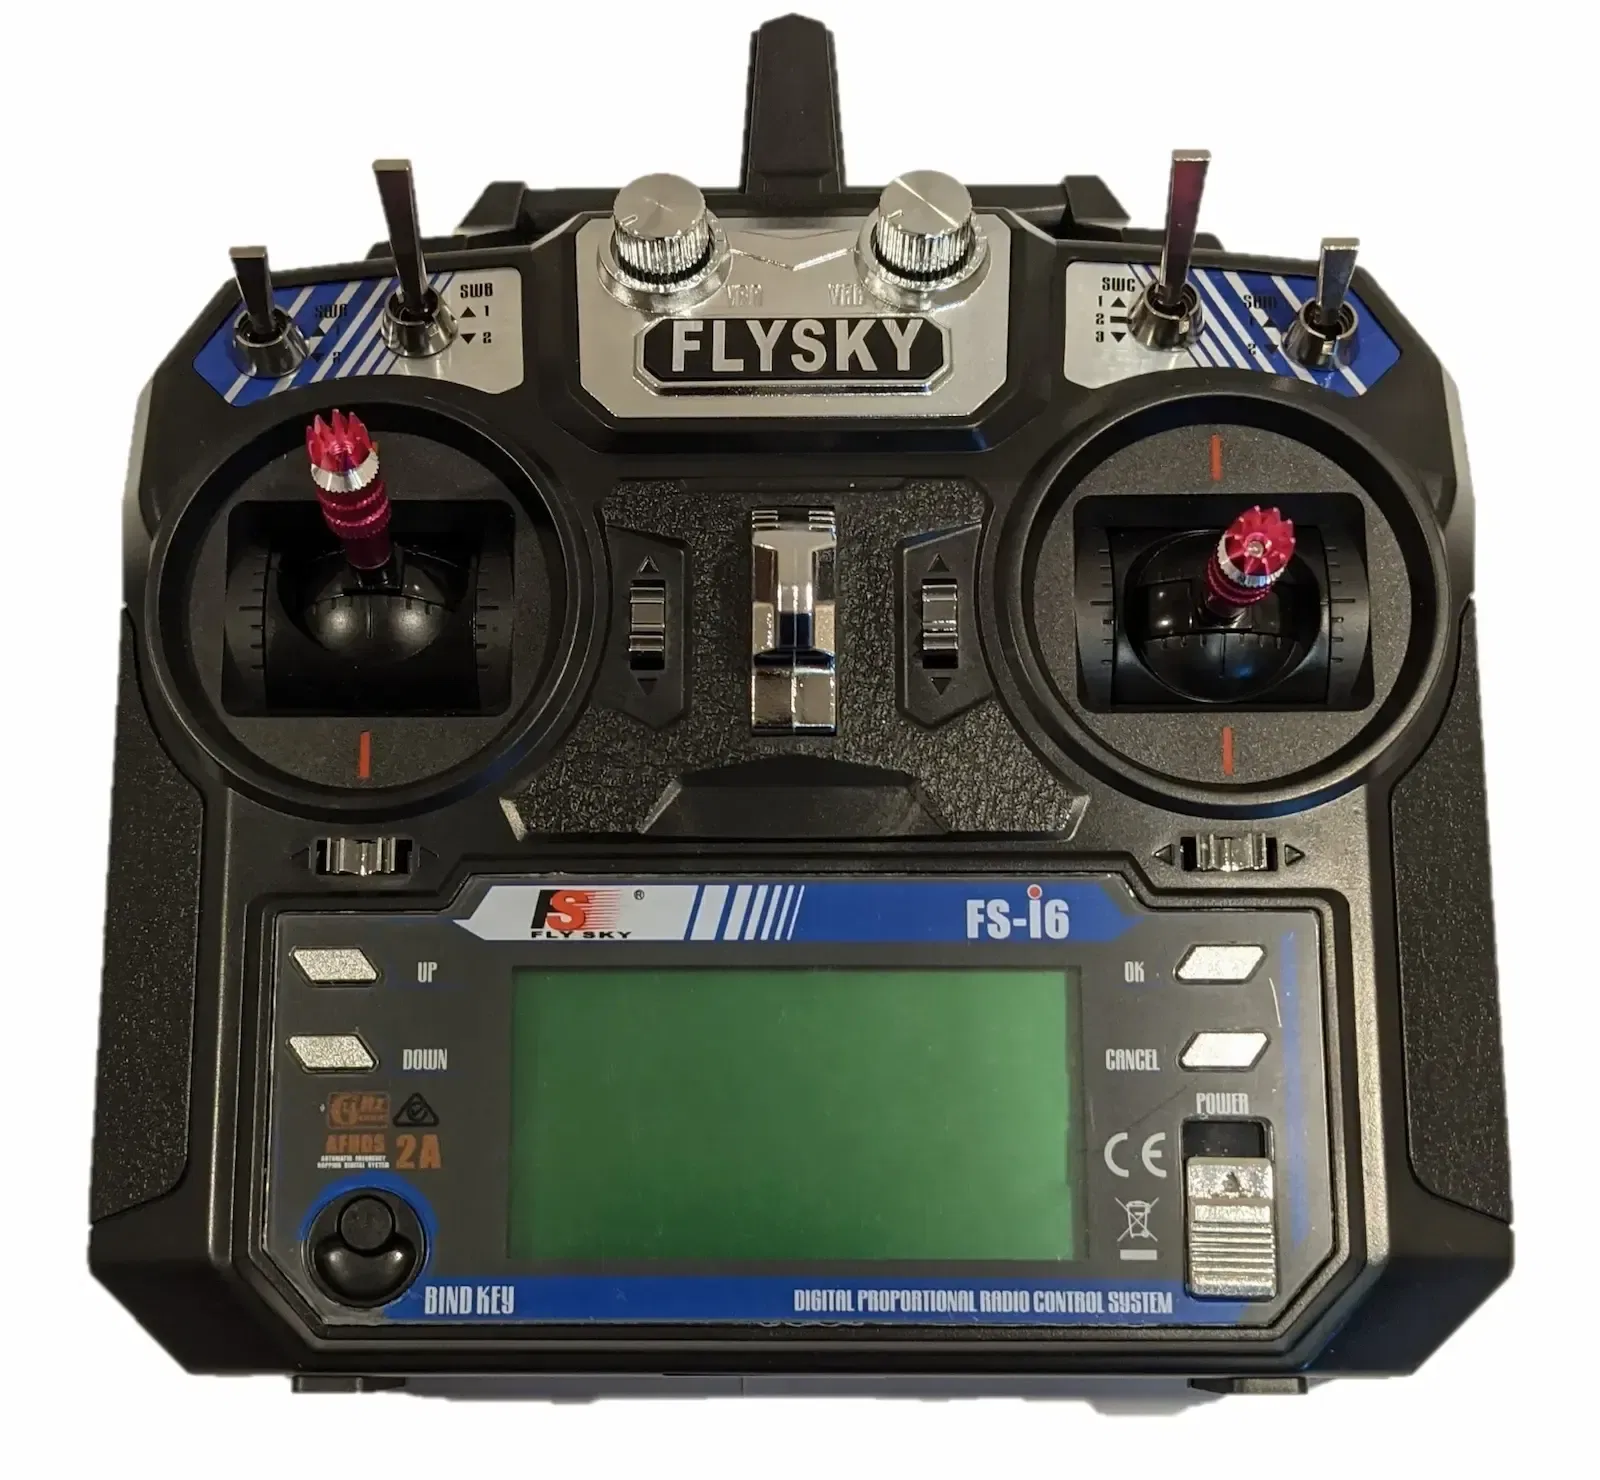
- Transmitter/Receiver: FlySky
- Measurement tools: Kitchen scale + Wattmeter
- Mount: Wooden block with motor fixed on top (total weight of wood + motor = 1200 g)
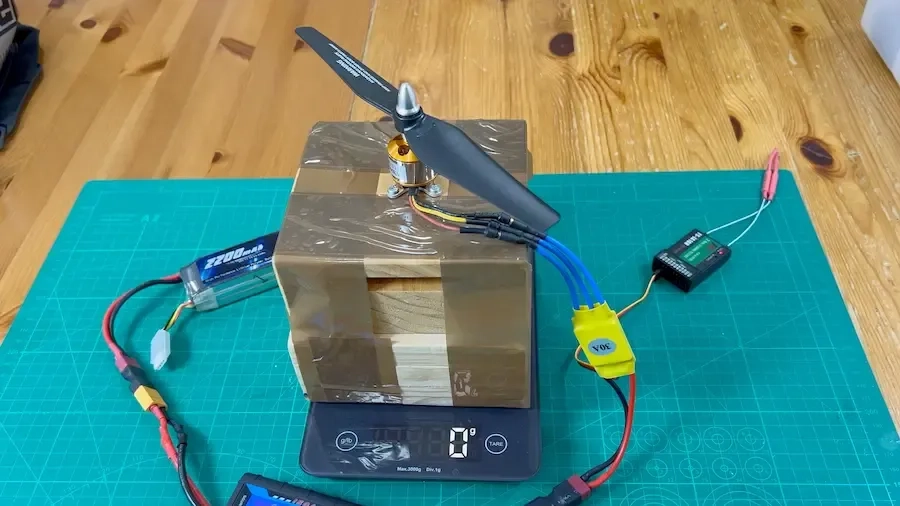
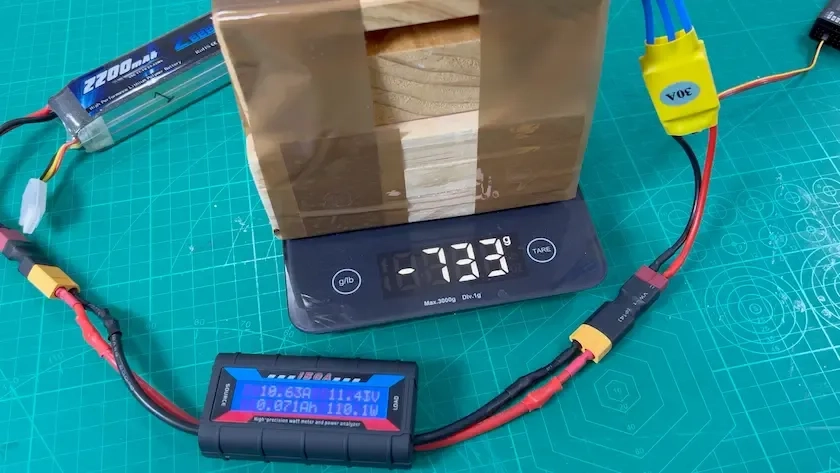
Experiment Setup
I mounted the motor firmly onto a piece of wood. The wooden base, along with the motor, weighed about 1200 grams. The entire block was then placed on a digital kitchen scale.
The procedure:
- Taring the scale – I zeroed the reading so the scale would only show changes in force (i.e., thrust).
- Power connection – Connected the motor through the ESC to the 3S LiPo battery.
- Throttle increase – Using the FlySky transmitter, I slowly increased throttle while monitoring:
- The kitchen scale reading (grams of thrust)
- The wattmeter reading (current drawn in amps)
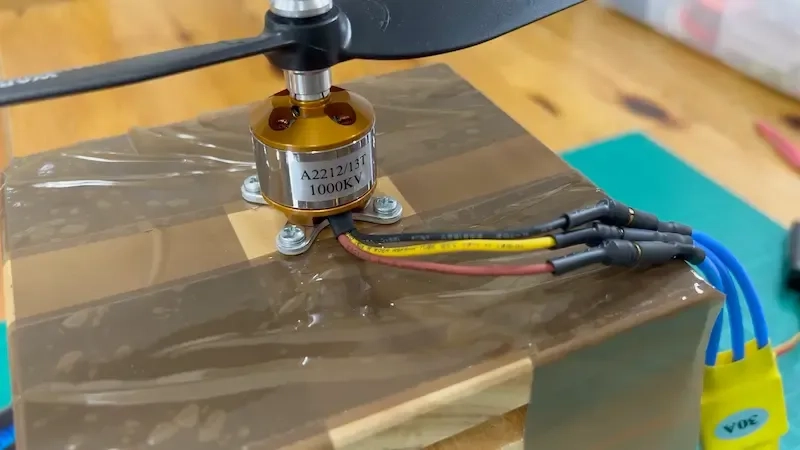
I secured the 1000KV brushless motor to a solid, heavy piece of wood, creating a stable base for the experiment. The choice of material was not random; the wood was deliberately selected to be heavier than the maximum thrust force the motor and propeller combination could generate. This extra weight provided a strong counterbalance, ensuring that the entire setup remained firmly in place during testing.
Without such precaution, the force produced by the spinning propeller could easily lift or tip over a lighter base, leading to unstable measurements and potentially dangerous situations. A sudden shift or fall might not only damage the motor and electronic components but could also result in the prop striking nearby objects or even causing injury.
By anchoring the motor to a sturdy wooden block, I minimized these risks and ensured the accuracy of the experiment. A stable platform means that the thrust force measured on the scale reflects only the motor’s performance, rather than being distorted by unwanted movements of the test rig. This careful preparation highlights the importance of safety and reliability when conducting practical experiments with high-speed propellers.
When paired with a 3S LiPo battery (nominal voltage of 11.1 V, and up to 12.6 V when fully charged), a 1000KV brushless motor is expected to spin at approximately 11,100 RPM at nominal voltage, and up to around 12,600 RPM at full charge.
It’s important to note that this is the theoretical no-load RPM (KV × Voltage). In practice, once a propeller is mounted, the actual RPM will be lower due to load, air resistance, and efficiency losses. For example, with a 9×4 propeller, the motor may reach about 70–80% of the theoretical value depending on the ESC and battery condition.
This relationship between KV and voltage highlights why choosing the right propeller size is crucial: a higher RPM can mean more thrust, but also higher current draw, more heat, and potential damage to the ESC if not properly matched.
While theoretical calculations of RPM and thrust are useful, real-world testing requires measuring how much current and power the motor actually draws under load. This is where a wattmeter or power analyzer becomes an essential tool.
By connecting a wattmeter in series between the battery and the ESC, you can monitor:
- Voltage (V) supplied by the battery under load.
- Current (A) drawn by the motor at different throttle levels.
- Power (W) consumed (calculated as Voltage × Current).
- Sometimes even mAh consumed, which helps estimate flight time.
These readings provide valuable insights into whether the setup is operating safely within the limits of the motor, ESC, and battery. For example, if the current exceeds the ESC’s rating, it’s a clear sign that the propeller size should be reduced or the setup reconfigured.
A wattmeter not only helps optimize performance but also prevents costly damage to your components.
Results
- At 75% throttle, the motor produced about 730 grams of thrust.
- The current draw peaked at around 10.6 A.
These results are impressive considering the motor size and propeller choice. A thrust of 750 g is already more than half the weight of many foam RC trainers, showing this setup can comfortably power a lightweight aircraft.
You can watch the experiment on our Youtube channel:
Discussion
Using a kitchen scale is a simple yet effective method to measure static thrust. While professional thrust stands provide more accuracy, this DIY approach is sufficient for hobbyists.
Some observations:
- The thrust-to-current ratio gives insights into propeller efficiency.
- Increasing throttle beyond 75% would draw more current, potentially leading to overheating without significantly increasing thrust.
- A 1000KV motor with a 9×4 prop on 3S is well-suited for trainers or park flyers weighing under 1 kg.
Areas of Improvements
While the experiment provided useful results, there are ways to enhance accuracy and consistency:
- Increase motor clearance
- By leaving a bigger gap between the motor and the wooden block, airflow interference can be reduced. This gives a more accurate measurement of true thrust.
- Use load sensors and Arduino
- Replacing the kitchen scale with a load cell sensor connected to an Arduino would allow precise thrust readings.
- With Arduino controlling the PWM signal to the ESC, the setup could record thrust vs. throttle % automatically.
- This would eliminate human error in throttle control and make results repeatable and graphable.
Conclusion
This experiment shows that you don’t need sophisticated lab equipment to measure thrust. With just a kitchen scale, wattmeter, and basic RC gear, you can gather valuable data about your motor and propeller setup.
For anyone experimenting with RC aircraft, I highly recommend performing similar tests before maiden flights—it helps you match the right motor, prop, and battery for safe and efficient flying.
Related Topics:
Remote control (RC) systems form the communication bridge between an RC pilot and their aircraft. Whether you're flying a beginner trainer or a custom FPV aircraft, the transmitter and receiver work together to deliver precise control. In this guide, we’ll cover how RC systems function, break down essential features like channels and signals, and focus on FlySky—a brand known for reliability, affordability, and beginner-friendliness

Why do RC airplanes have a tendency to turn left on takeoff? This guide explains right thrust, the turning left tendency, why propeller forces push aircraft off course, and how to fix it.

Learn how to safely charge and discharge Li-Po and Li-Ion batteries. Understand battery ratings, charging currents, discharge limits, balanced charging, testing damaged batteries, and safe disposal practices

Understand Electronic Speed Controllers (ESC) for RC planes. Learn how ESC works, choosing the right size, cooling tips, and what happens if misused. Perfect guide for beginners and hobbyists

A Practical Guide to Selecting the Right Motor Based on Aircraft Size, Power, and Control RC airplanes rely on different types of motors for propulsion depending on their size, purpose, and power requirements. Whether you're building a micro indoor flyer or a large-scale gasoline-powered model, understanding motor types is essential. This guide covers the most commonly used motors in RC aviation, explains how speed is controlled, and outlines which aircraft types each motor suits best. It also provides real-world motor examples with performance data.

Learn how Pulse Width Modulation (PWM) works and how it's used to control LED brightness, motor speed, and servos in electronics and RC projects. Simple explanations with real-world examples.
Or you can explore other categories
Electronics